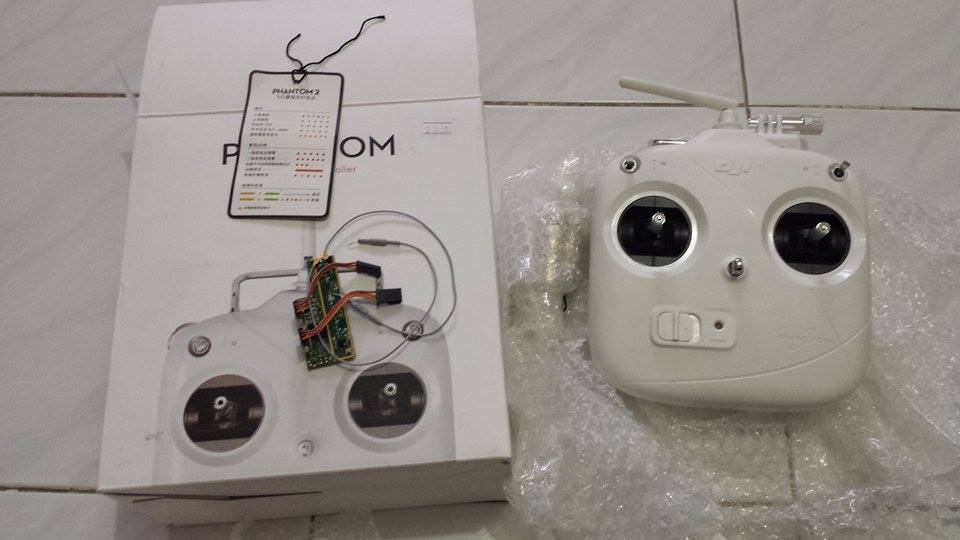
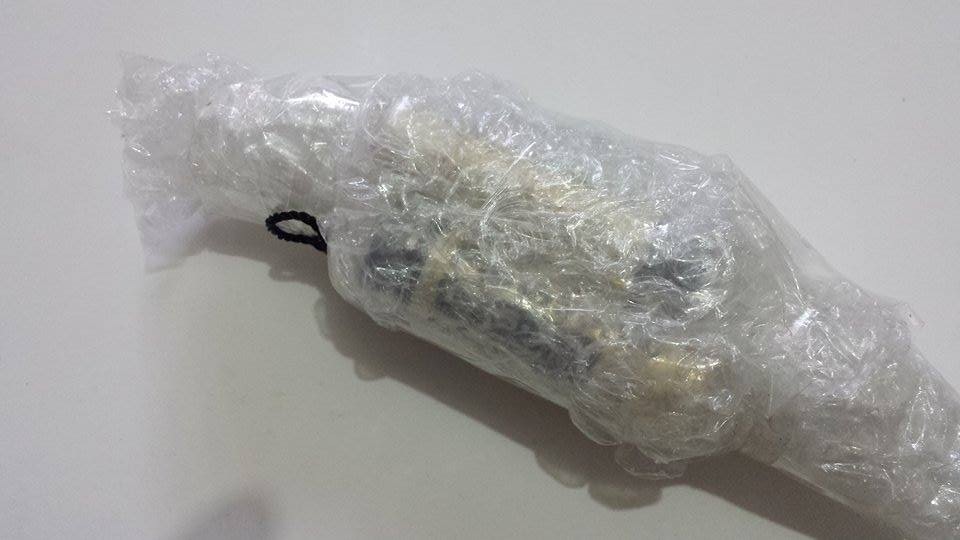
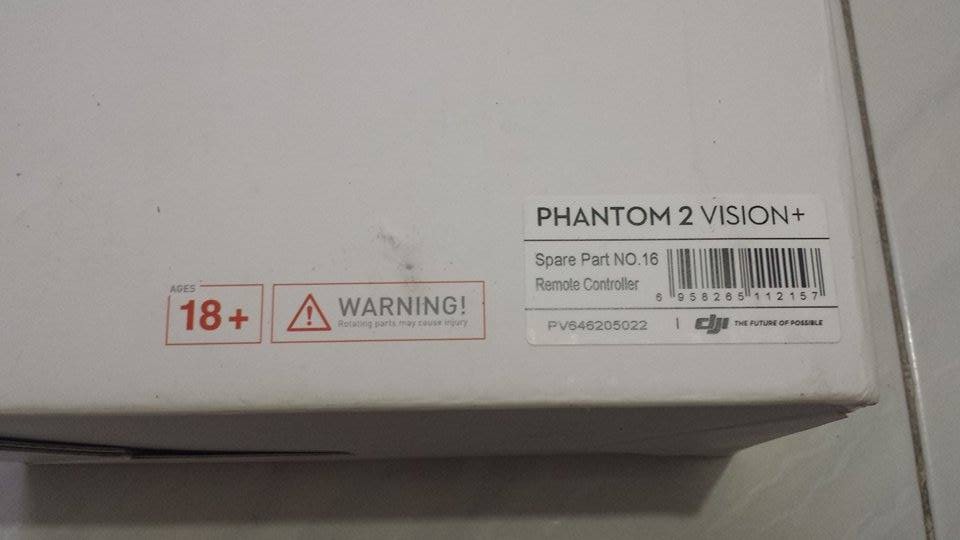
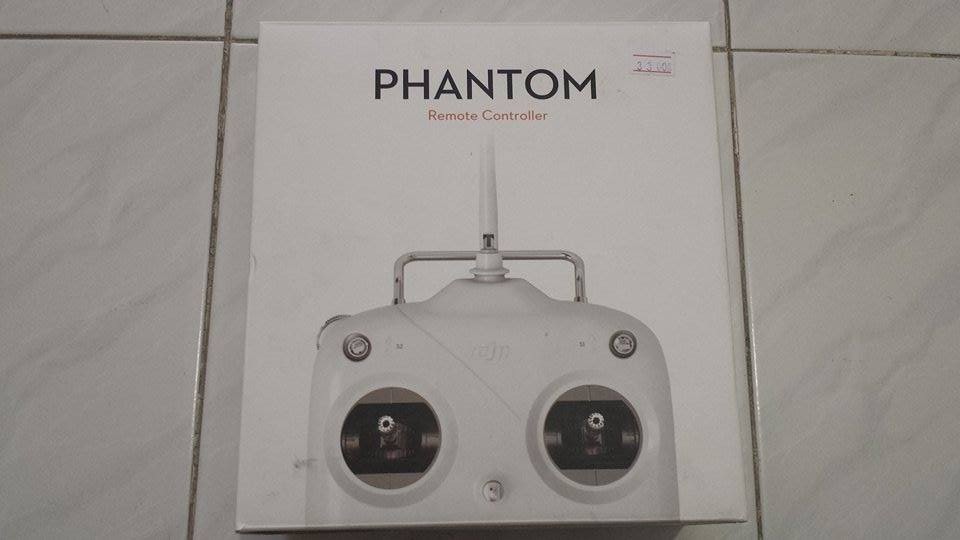
DJI Phanton 2 Vision Vision + Transmitter Remote Control 5.8 Ghz PVT581


| รหัสสินค้า | SKU-00066 |
| หมวดหมู่ | สินค้ามือสอง |
| ราคาปกติ | |
| ลดเหลือ | 1,900.00 บาท |
| สภาพ | สินค้ามือสอง |
| เกรด | ดีมาก (95-99 %) |
| ลงสินค้า | 22 เม.ย. 2558 |
| อัพเดทล่าสุด | 6 พ.ค. 2558 |
| คงเหลือ | 0 ชิ้น |
ขออภัย สินค้าหมด

รายละเอียดสินค้า
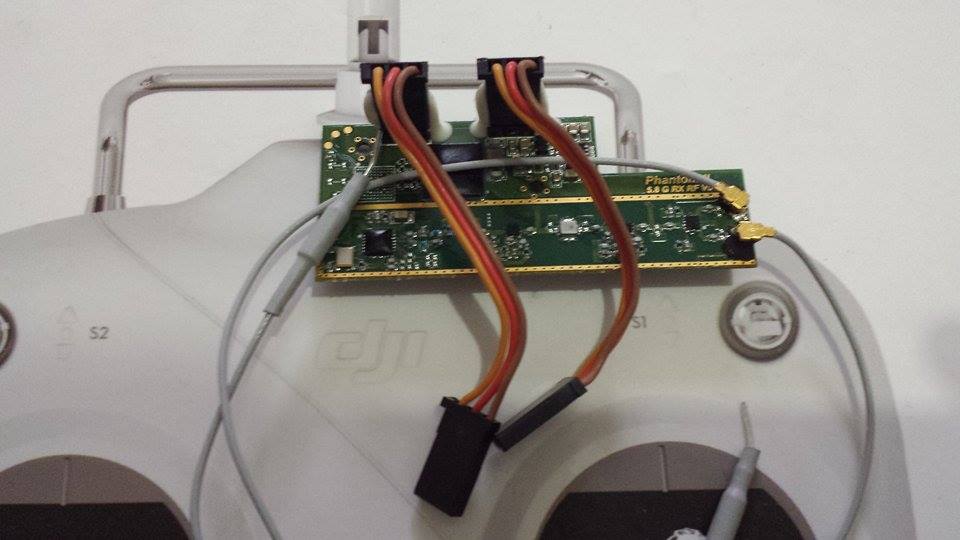
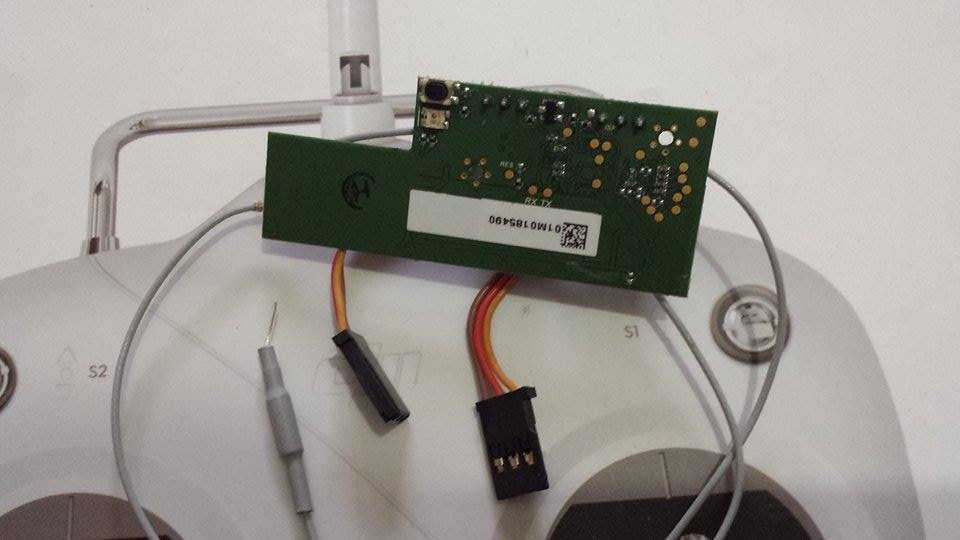
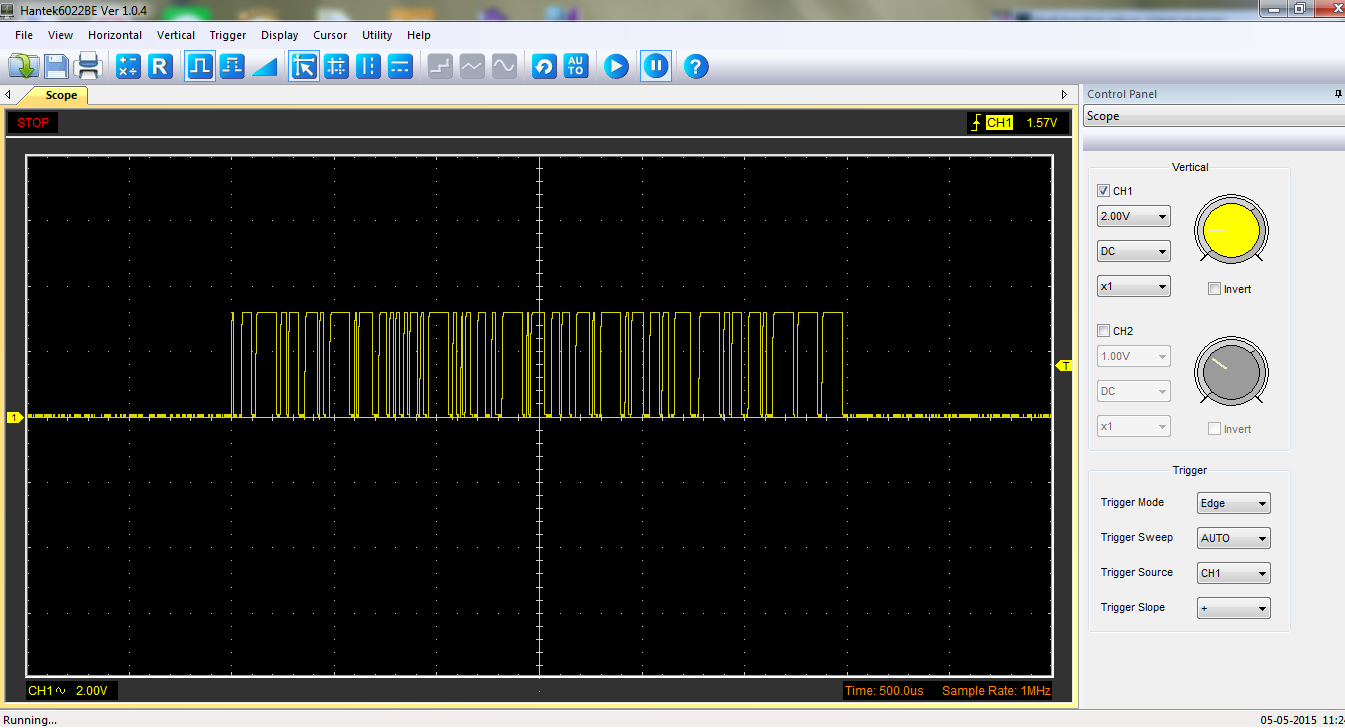
ลองเอาสโคบจับสัญญานที่ส่งค่าออกจากรีซีป
ความเร็วในการส่งข้อมูลแต่ละชุดอยู่ที่ 100 Hz

- Product Information
- USD $95
- 5.8G Radio Controller for the Phantom FC40, Phantom 2 Vision, Phantom 2 Vision+.
-
Phantom 2 Vision now supports Ground Station function!

Ground Station support with:
- Planned flight missions of up to 16 custom waypoints.
- One-touch "Go Home" function.
- Flight safety protection:
- 3.1 miles (5km) flight distance limit.
- Ground station is automatically disabled when the Phantom battery level falls below 30%.
- 1640ft (500m) maximum flight radius from HOME point, 656ft (200m) altitude limit.
This function will be available within the updated DJI Vision app for iOS and Android (DJI Vision app is being updated to iOS v1.0.41 and Android v1.0.50).
Important: Ensure that your Phantom is running the latest firmware v3.04.
The Phantom 2 Vision - "Your Flying Camera", "The Spirit of Sharing": Not only does it inherit the trademark design excellence of the much loved Phantom, but also represents a breakthrough in the technology of aerial photography. The Phantom 2 Vision is a stronger, smarter aerial platform in every aspect. Batteries with greater capacity, coupled with more efficient propellers design, mean a longer flight time and a more stable flight experience. The Phantom 2 Vision also comes equipped with a 14 megapixel HD video camera of DJI’s own design, which can be easily controlled using the Apple IOS\Android APP. All of this together ensures an unmatched and incredible flying and recording experience."
Features:
-
5.8G Remote Controller (with Mobile Phone holder)

-
Wi-Fi Range Extender

-
Phantom 2-Preparing the Remote Controller
The PHANTOM 2 remote controller can be configured in the PHANTOM RC Assistant software. The sticks mode is Mode 2 on delivery.

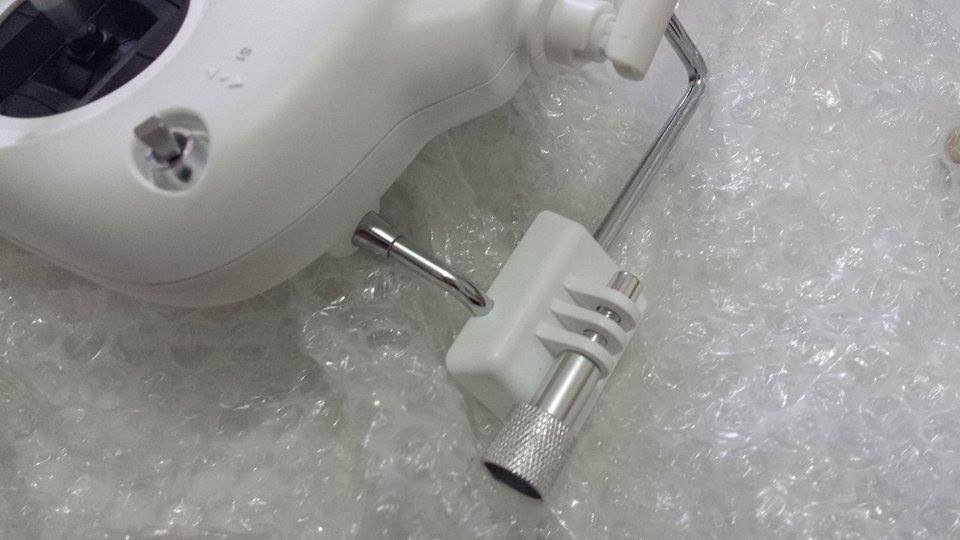
[1]Antenna [2]Carrying Handle [3]3-Position Switch S1 [4]3-Position Switch S2 [5]Joystick1(J1;J2) [6]Joystick2(J3;J4)
[7]Neck Strap Attachment [8]Power Switch [9]Power Indicator [10]Battery Compartment [11]Micro-USB Port [12]Slide Lever [13]Potentiometer
Contents
[hide]Power on the Remote Controller

Warnings:- (1)Please make sure the batteries have enough capacity before use. If the low voltage warning alert sounds (refer to the ), please replace batteries as soon as possible.
- (2)Using the correct type of battery will prevent risk of damage or malfunction.
- (3)For long term storage, be sure to remove the batteries from the remote controller.
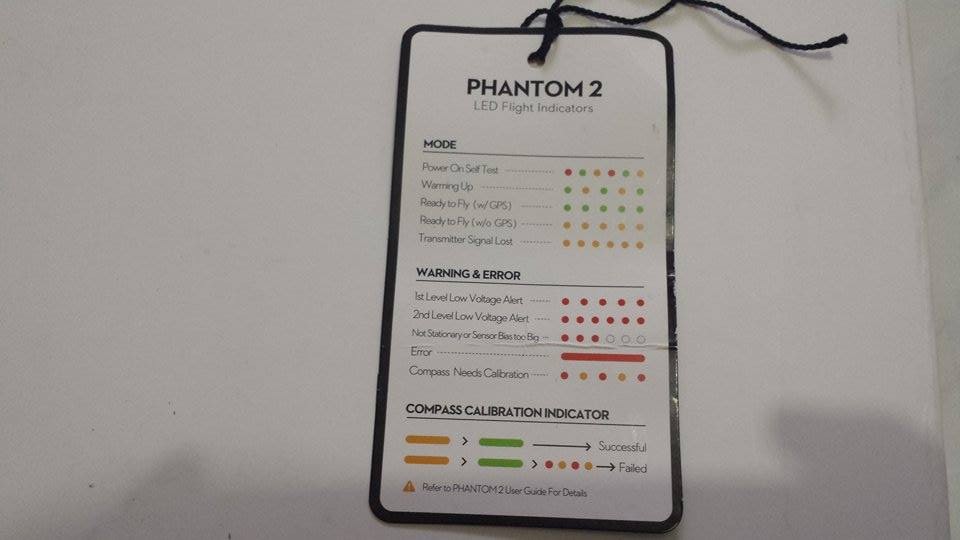
Remote controller Power LED Indicator Status

Warning
- (1)The remote controller will power off automatically when battery voltage drops below 4V. Land and change batteries as soon as possible when the low voltage alert occurs to avoid loss of control during flight.
Antenna Orientation
The remote controller’s antenna should point skywards without obstructions for maximum communication range during flight.

Remote Controller Operation
The operations of remote controller are based on mode 2 stick configuration.
- The ‘stick neutral’ positions and ‘stick released’ mean the control sticks of the remote controller are placed at the central position.
- To ‘move the stick’ means that the stick of remote controller is pushed away from the central position.
- Slide Lever is used for the pitch control of the H3-2D gimbal.


Warnings
- (1)For ‘Ready to Fly’ the aircraft will hover when all sticks are released.
- (2)For ‘Ready to Fly (non-GPS)’ the aircraft will only keep the altitude when all sticks are released.
Linking the remote controller& built-in receiver
PHANTOM 2 has a built-in receiver, the link button and indicator located on the bottom of the aircraft as illustrated in the below Figure. The link between the remote controller and aircraft is already established for you so you can initially skip this procedure. If you ever replace the remote controller, re-establishing the link is required.

Linking procedures
- 1. Power on the PHANTOM 2.
- 2. Turn on the remote controller and place it 0.5m~1m away from the aircraft.
- 3. Push the link button with a thin object and hold it until the Link indicator blinks red, then release it.
- 4. When the Link indicator turns solid green, the link between the remote controller and the built-in receiver has been successfully established.
Link Indicator

Phantom 2-Flight
Flying Environment Requirements
- (1)Before your first flight, please allow yourself some flight training (Using a flight simulator to practice flying, getting instruction from an experienced person, etc.).
- (2)DO NOT fly in bad weather, such as rain or wind (more than moderate breeze) or fog.
- (3)The flying field should be open and void of tall buildings or other obstacles; the steel structure within buildings may interfere with the compass.
- (4)Keep the aircraft away from obstacles, crowds, power lines, trees, lakes and rivers etc.
- (5)Try to avoid interference between the remote controller and other wireless equipment. (No base stations or cell towers around)
- (6)The flight control system will not work properly at the South Pole or North Pole.
- (7)All parts must be kept out of the reach of children to avoid CHOKING HAZARDS; if a child has accidentally swallowed any part, you should seek immediate medical assistance.
Starting the Motors
A Combination Stick Command (CSC) is needed to start the motors. Push the sticks according to one of the options below to start motors. Once the motors have spun up, release both sticks simultaneously. The same command is used to stop the motors.

Takeoff/Landing Procedures
- 1. Start by placing the PHANTOM 2 on the ground with the battery level indicators facing you.
- 2. Turn on the remote controller.
- 3. Power on the aircraft by turning on the intelligent battery.
- 4. When LED flight indicator blinks green/yellow, the PHANTOM 2 is entering Ready to Fly/Ready to Fly (non-GPS) mode. Start the motors with the CSC command.
- 5. Push the throttle stick up slowly to lift the aircraft off the ground. Refer to for more details.
- 6. Be sure you are hovering over a level surface. Pull down on the throttle stick gently to descend and land.
- 7. After landing the aircraft on the ground, keep the throttle stick at its lowest position for about 3 to 5 seconds which will automatically stop the motors.
You SHOULD NOT execute the CSC during normal flight! This will stop the motors and cause the aircraft to descend rapidly and drop without any type of control.
- (1)When the LED flight indicator blinks yellow rapidly during flight, the aircraft has entered into Failsafe mode, refer to for details.
- (2)A low battery capacity warning is indicated by the LED flight indicator blinking red slowly or rapidly during flight. Refer to the for details.
- (3)Watch the quick start video about flight for more flight information.
Failsafe Function
The aircraft will enter Failsafe mode when the connection from the remote controller is lost. The flight control system will automatically control the aircraft to return to home and land to reduce injuries or damage. The following situations would make the aircraft fail to receive a signal from the remote controller and enter Failsafe mode:
- (1)The remote controller is powered off.
- (2)The remote controller is powered on but the S1 is toggled in the position triggering the Failsafe (this must have been configured in the PHANTOM 2 Assistant software).
- (3)The aircraft has flown out of the effective communication range of the remote controller.
- (4)There is an obstacle obstructing the signal between the remote controller and the aircraft, essentially reducing the distance the signal can travel.
- (5)There is interference causing a signal problem with the remote controller.
Failsafe works differently depending on the mode the aircraft is in when Failsafe mode is initiated whether it is in the Ready to Fly or Ready to Fly (non-GPS) mode.
Ready to Fly (non-GPS) ---- Automatic landing The flight control system will try to keep the aircraft level during descent and landing. Note that the aircraft may be drifting during the descent and landing process.
Ready to Fly ---- Automatic go home and land The flight control system will automatically control the aircraft to fly back to the home point and land.
Home Point When the aircraft is initializing the Ready to Fly status, the aircraft will record the current GPS coordinates as the home point. It is recommended to lift off only after Ready to Fly status is confirmed for the safety of being able to fly back to home point successfully in case the Failsafe mode is initiated.
Go Home Procedures

Quickly switching the S2 switch of the remote controller from upper most to lower most positions 3 to 5 times will reset the home point of PHANTOM 2. When the home point is set, you will see a series of rapid green blinks on the LED Flight Indicator. The definition of “home point” is:
- i) The place the PHANTOM 2 returns to when the control signal is lost.
- ii) The home point is used to calculate the horizontal distance between you and the aircraft, the distance will be displayed on the screen if using a wireless video transmission module.
Regaining Control During Failsafe Procedure

Low Battery Capacity Warning FunctionThe low battery capacity warning alerts users when the battery is close to depletion during flight. When it appears, users should promptly fly back and land to avoid accidental damage. The PHANTOM 2 has two levels of low battery capacity warning. The first appears when the battery has less than 30% power and the second appears when it has less than 15% power.
- (1)When battery power drops below 30% and LED indicator will blink red slowly.
- (2)At lower than 15% the LED indicator will blink red rapidly, the PHANTOM 2 will also begin to descend and land automatically. After it has landed, keep the throttle stick at its lowest point or execute CSC.
- (3)There is a hidden third low battery threshold in addition to the 1st and 2nd level warnings. This uses 10.65V as its threshold. Both this voltage threshold and the 2nd Level Low Battery Warning will trigger auto-landing. Altitude can be maintained if necessary by pushing up on the throttle stick.
Warnings:- (1)Remember to fly your PHANTOM 2 back as soon as you see a low battery capacity warning.
- (2)Keeping the battery contact needles and pads clean is very important. Any dirt and dust may cause a communication failure.


วิธีการชำระเงิน
ร้านค้านี้ยังไม่ได้กำหนดวิธีการชำระเงินค่ะ กรุณา ติดต่อกับทางร้าน เกี่ยวกับรายละเอียดในการชำระเงิน
โทรหาก่อนโอนเงินครับ ทินกร T. 086-054-0582
หรือ แจ้งข้อความทาง Line id tinnakonza
หรือ แจ้งข้อความทาง Facebook https://www.facebook.com/tinnakonza
จ่ายบิทคอยน์สกุลเงินดิจิทัล
BTC - bc1qxhmdufsvnuaaaer4ynz88fspdsxq2h9e9cfrtyt
ETH-erc20 - 0xaB6B4b11378a57933333e4Acfdc45567Dd78ddfrer
กระเป๋า SOL = 9AV2cujwKdcUkskv9Vg4vrWT2vfNxRrMTN5fV1FvyiSk
ชำระเงินผ่านธนาคาร
ชำระเงินออนไลน์
- ค่าธรรมเนียม 7% + 100 THB
- การชำระผ่าน PayPal คุณไม่จำเป็นต้องแจ้งชำระเงิน เนื่องจากระบบจะจัดการให้คุณทันที ที่คุณชำระเงินเสร็จสมบูรณ์


สินค้าในตะกร้า ({{total_num}} รายการ)

ขออภัย ขณะนี้ยังไม่มีสินค้าในตะกร้า
ราคาสินค้าทั้งหมด
฿ {{price_format(total_price)}}
- ฿ {{price_format(discount.price)}}
ราคาสินค้าทั้งหมด
{{total_quantity}} ชิ้น
฿ {{price_format(after_product_price)}}
ราคาไม่รวมค่าจัดส่ง
➜ เลือกซื้อสินค้าเพิ่ม